Wednesday, 27 April 2016

Item Category based LCM(Landed Const Management) / How to receive item without LCM in LCM enabled organization

We will show here how we can receive material with LCM charges in LCM enabled organization for a item category or you can bypass LCM charges for other item which is not falling under "LCM Category" in LCM as Service flow.

Step1: Need to create a separate Key Flex Field  under item category.
Step2: Need to create Value Set

Step3: Need to create values
Step4: Need to create Category Code
Step5: Need to create Category Set
Step6: Need to assign item to this Category Set.
Step7: Need to enable a profile option to tag this item category with LCM. INL: Item Category Set with value "LCM_CAT_SET"
Step8: Need to create a PO with the Item mention above for LCM enabled Organization. Do the LCM process as applicable LCM as Service flow.

In case of LCM AS Service Charges will calculate automatically if item falling under this category. So it means if the item is not falling under this category will not hit LCM charges and you can do Receive, Accept, Deliver as applicable


Thursday, 21 April 2016

How to Adjust Number Format to use Commas in Oracle Application or Currency / Amount Format Separated By Commas in R12.2

Step1: Need to login in Oracle application. Home page will appear. Click Setting icon and choose "Preferences".
Go to Regional Section
Mention Number Format, Currency, as per your choice. Then click on Apply.

Step2: Set Profile option "Currency: Thousands Separator" value as "Yes"
Step3: Bounce the Apache. Login as Functional Administrator > Core Service(Tab) > Caching Framework(Sub Tab) > Global Configuration

Step4: For testing enter a Journal and check

Wednesday, 20 April 2016

Grade wise Item Pricing in Sales Order / How to change(Automatically) Sales Order Price according to Material Grade

We are considering that we have a Material with Grade controlled and Default Grade is A. This material can have with other Grades like B and C depending upon quality. So when we sale the item through sales order, according to Grade item selling price should change in sales order.

Step1: A item need to create and assign to inventory organization. Item should be Grade Enabled and Default Grade should maintained in Item Master in Organization Level and also LOT should be enabled.
 Step2: Need to Define Price List for the Material according to Grade. So we need to enter 3 line in the price list and mention Grade in pricing attribute.
Step3: Need to mention GRADE in pricing attribute, click on the pricing Attribute a window will open
Step4: Need to enter a sales order and mention the item which created in Step1.
Step5: Price will not default as there are 2/3 line mention in price-list with same data for different Grade. So we need to select Grade in Sales Order line. By default Grade field is not there in sales order line.

Step6: So we need to bring the field by click on Folder menu from Toolbar then click on show field, a LOV will appear, choose "Grade" now Grade field will enable.
Mention the Proper Grade in Grade field.

Step7: No click on Action button and choose Price Line, the unit price will display.
Step8: Now change the Grade from A to B and click on Action and choose Price Line, now line price will change from 4000 to 3500.


Monday, 18 April 2016

How to receive Cash or Cheque against Sales Order in Advance / Prepayment against Sales Order

We consider sales order related all setup are there.
Step1: A Receivable activity need to create where type = Prepayment
Step2: Need to create a Sales Order then click on Action and choose Prepayment, a new window will appear.
Provide required information then click on process payment.
Now a AR Receipt will generate in system
Click on the Appy button to view Sales Order information in receipt
Step3: Now Do the shipment of Sales Order as normal.
Step4: Run AutoInvoice a Prepayment matching program will automatically run and Receipt will automatically Apply with Invoice.


Withdraw Purchase Order from Workflow if status are InProcess / Pre-Approved after sending for approval in R12.2.5 or Purchase order status change from InProcess / Pre-Approved to Incomplete.


Setup:
Purchasing administrators can control the buyers ability to withdraw purchase orders.
Also the notification can be sent to all approvers when withdrawing the document.
Navigation : Purchasing Responsibility > Setup > Purchasing > Document Styles


Steps:
1. In Buyer Work Center > Orders Page, select the order which is in 'InProcess' / 'Pre-Approved' status.
2. In the "Select Order" LOV, select the "Withdraw" option & click Go.


A window will appear
Put a reason then apply.

Now your order status will be incomplete
Now you can modify the order and resend for approval.


How to approve Negotiation (Quote) under Order Management Responsibility through AME via Supervisor Hirearchy

We will approve Quote in two level based on amount . For this we will tag supervisor in each employee. AME will use the hierarchy for Quote approval. Prerequisite Quote and Sales order setup should be there in system

Step1: Need to define 3 employee(Ex A,B,C) and mention the supervisor on each employee. Employee A has supervisor B and Employee B has supervisor C.

Senario1: Employee A will create Quote then it will move to Employee B and when B approve it will move to Employee C and Employee C is final approver if quote amount is >10000

Senario2: Employee A will create Quote then it will move to Employee B and when B approve the quote get approve if quote amount is <10000

Step2: AME Configuration: Choose Approval Management Business Analyst responsibility.(note: we have already grant this responsibility for use)

Step3: Search Transaction Type under Approval Process Setup a search window will appear.
Select Application and value Order Management then select Order Management Negotiation Approval

Step4: Now Order Management Negotiation Approval will appear under transaction type Click on setup icon
We will use existing Ordered Amount Attribute.

Step3: Click Condition tab then click create under regular sub tab
 put order amount >10000 and apply

Step4: Similarly create another condition with order amount <=10000 and apply

Step5: Move to Action Type Tab click on Use Existing Action Type and choose Supervisory Level where description is "Chains of authority based on number of supervisory levels".
 Step6: Move to Rule under Main tab click on Create button.
fill all the information as describe in above picture like rule name , add condition , add action then apply. it will create a authority for any amount approval above 10000.

Step7: Repeat the same as Step6 it will create a authority for approval amount <=10000.
Step8: Now create a Quote from Order Management Responsibility by the user A where employee A is tagged with amount 12000. Save the Quote. then Choose "Submit Draft" from action list the status will be as Pending Internal Approval.

Step9: Check from User B where employee B tagged you will get the notification for the quote. Open the notification and approve the same.

Step10: Check from User C where employee B tagged you will get the notification for the quote. Open the notification and approve the same.

Your Quote will approve and status will be pending customer acceptance.


Sunday, 17 April 2016

Credit Memo against Discounted(Sales Order Discount) Auto Invoice with sperate charge account through SLA(Sub Ledger Accounting) configuration

 We are considering that when Auto Invoice Created from Sales order with discount and discount amount hit in charge account other than revenue. So when we need to generate Credit Memo against sales Order or Auto Invoice so discount portion should hit in the same account as it was hit at the time of auto invoice. For Auto Invoice please refer the Other Post.

For modifier please refer the  post.

Setp1: Create ADR(Account Derivation Rule) by coping from ORACLE to User with rule code:CM_DIST_CCID. Add a condition : Transaction Line Description != 'OMDISCOUNT.14031' and Insert Constant with account code and condition: Transaction Line Description != 'OMDISCOUNT.14031'

Step2: Create JLD(Journal Line Definition) by coping from ORACLE to User with Event Class:Credit Memo and Event Type: All. Scroll down to Credit Memo Default Revenue under section Line Assignment. Select the user ADR from LOV which one created in Step1.


Step3: Create AAD (Application Accounting Definition) if not created earlier by coping from ORACLE to User with definition code:AR_DEFAULT_ACCRUAL. Select the Credit Memo by scrolling under section Event class and event type assignment. Go to JLD assignment section insert a new line with JLD created in Step2. Delete the seeded one where owner is oracle.
Step4: Now create a sale return and run auto invoice for credit memo, once the credit memo is created in AR, run the create accounting in draft mode and check accounting.


How to record Sales Order discount( Through Modifier) in seperate account in Account Receivable(Auto Invoice) through SLA(Sub Ledger Accounting)

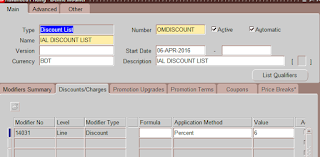
Setp1: Need to Create Modifier for Discount with name OMDISCOUNT


In Receivable discount will appear in line description as "OMDISCOUNT.14031"(<Modifier Header Number>.< Modifier Line No>"

Step2: OM System Parameter set value "Yes" for "Show Discount Details on Invoice" - to display discount in AR invoice

Step3: Create a sales order then do the shipping as normal
Step4: Create Autoinvoice
Step5: Confirm AutoInvoice is created successfully and discount line created as revenue line.(AR Distributions)


Step6: Create a ADR(Account Derivation Rule) by coping from ORACLE to USER where rule code:TRX_DIST_CCID


Add 1 Constant: <account code> and put condition like  Transaction Line Description = 'OMDISCOUNT.14031'
Update Source:Transaction Distribution GL Account and put condition like  Transaction Line Description != 'OMDISCOUNT.14031'

Step7: Create a JLD(Journal Line Definition) by coping from ORACLE to USER where event class:Invoice and Event Type:All


Select Journal line type as "Invoice Revenue" by scrolling then change the rule name created in Step6 so owner will be User in the section of account derivation rule.

Step8: Create AAD(Application Accounting Definition) by coping from ORACLE to USER where definition code:AR_DEFAULT_ACCRUAL and definition name:Receivables Default Accrual
Select event class Invoice by scrolling under event class and event type assignment.
Insert a line under Journal Line Definitions assignment with JLD created in Step7 where owner USER. and Delete the line where JLD is "Invoices - Default Accrual" and owner :Oracle.

Step9: Click on the Validate button on AAD screen

Step10: From Receivable Manager Respo run a request "Validate Application Accounting Definitions" with the ledger parameter for which you perform the setup.

Step11: Run create accounting in draft mode to check the accounting.